
BaElTo Manual
Manual last modified on 06.09.2025
BaElTo and manual written by Volker Dirr
https://www.timetabling.de/
BaElTo is a Basic Elective Tool
BaElTo is designed to assign students to projects. This is useful for schools organizing a project week or when students are required to choose a single elective subject. So every student can select between 1 and 3 projects (subjects). You can set the minimum and maximum number of students per project and BaElTo assigns students to projects while respecting the student limits per project. It can also try to prioritize the first choice and avoid assigning the 2nd and 3rd choices.
| There are currently a few limits. The limits can be increased. Please ask if you need higher limits.
|
There are a lot of nice features supported by BaElTo:
|
BaElTo needs a computer that can run Qt. So it is possible to run it for example with Microsoft Windows, Apple MacOS or Linux. Although it can run on a Raspberry Pi 2 (with just 0.9 GHz and 1 GB of RAM), a faster computer is recommended. Also a screen size with at least 1280x800 is useful. There is no command-line version (without a GUI), unlike FET.
Microsoft Windows users need Windows 10 or later. Download the BaElTo executable file from the FET Forum. This will extract all necessary files. Open the newly created directory and start BaElTo. There are alternative designs available that also support the dark mode. Double click on BaElTo-fusion and BaElTo-windows to start them. You can move the directory to another location and/or create a link to the executable file.
There are two MacOS versions available. Download the BaElTo files from the FET Forum. The MacOS-ARM version needs MacOS 14 or higher and is for M1, M2 and M3 CPUs. The MacOS-x86 version needs MacOS 11 or higher and supports Intel CPUs. Simply download the AppImage file and run it.
There is a Linux version available. Download the BaElTo file from the FET Forum. The Linux version needs a 64-bit OS with an x86 Intel or AMD CPU. Simply download the AppImage file and run it.
Even if BaElTo is a tidy Qt-application, you should read this manual carefully, because it includes some hints and warnings on how to use it correctly. Maybe view the video tutorials on YouTube:
| English YouTube videos |
|---|
| German YouTube videos with English subtitles |
|---|
Please select the desired language. You need to restart the program after changing the language.
You can change the brightness of the colors in this dialog. This is useful if you are using a dark mode setting.
BaElTo uses the internet connection to check if there is a newer version available on the internet and if the key is valid.
BaElTo doesn't offer internet web space to save your data. You need to host your data yourself.
Most users can just use the default settings.
Large institutions often use a proxy server. You need to set up the proxy then.
Please contact your administrator to get information about your proxy, host and port.
In most cases, if you're using a proxy server, you will already know your username and password.
BaElTo will always ask you for your user name and/or password if you keep them blank in these settings.
You can also enter them here, but be aware that both will be stored unencrypted on your computer.
There are currently 3 kinds of databases: Memory, SQLite and MySQL.
Memory:
This is very fast, but it doesn't save your data if you close BaElTo.
You can use it if you just want to test BaElTo
or if you are sure you can solve your problem quickly and don't need to change the data anymore.
SQLite:
This database is stored in a single file.
The SQLite version supports automatic backup. It is disabled by default.
If you set up the interval up to 1, then it will do a backup daily.
It will do a backup every second day if the interval is 2.
Select a directory on another hard drive to increase data safety.
MySQL:
This is a “real” database. You need to set up a MySQL server yourself if you want to use it.
Use SQLite if you don't know which database you should use.
You need to restart BaElTo if you change the database.
The seed is used by the generator.
Since generating with a different seed will produce different results,
the default should be to always update the seed.
For testing and developing a static seed can be useful.
If you haven't got an example file, then you can just generate a random example here.
You can check all files that should be written after solving a data set.
Get help in this menu.
There are 2 different variants to enter the data:
Please ask the author if you need another import filter.
At the first moment it might be the easiest (since it is self-explanatory) to enter the data directly in the GUI. But that might be too time consuming. Most schools already use a school administration software. They already have most of the data in that software since they also use it for other tasks like printing credentials. It might be much easier if you export your data into a CSV file and import it into BaElTo.
Another variant is to use a web based form to ask for the students electives and import that data by CSV. This is for example possible with Import from Google Forms.
If you want to enter the data manually, just press New Dataset to create a new data set.
You can do a (double-)click on many cells in the table.
You can delete a data set if you (double-)click on the id.
You can change the current data set if you single click on a cell.
You can modify the portfolio name and comments.
A Duplicate data set is useful if you want to do larger changes in the students elective and you are not sure if you want to drop that data later. So this is an easy variant to work with different data sets instead of changing the whole database (See chapter Database).
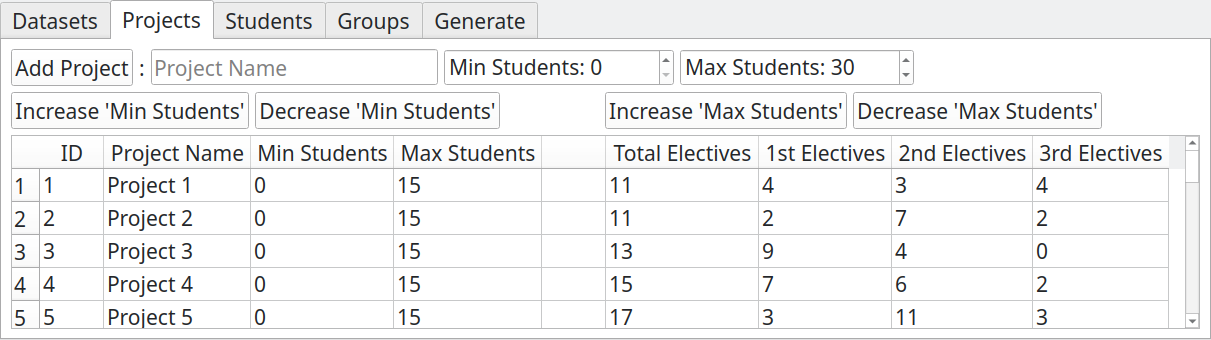
The Projects tab contains the project names, the minimum number of students and the maximum number of students.
You can do a (double-)click on many cells in the table.
You can delete a project if you (double-)click on the id.
You can modify the data if you (double-)click on it.
You can change the order of the sorting if you click on the headers.
The project name must be unique. You might wonder how to add a second similar project. Well, that is not needed. Since all projects will be at the same time, it is not critical if the students are in the 1st or in the second part of the same project. You can change that manually even after assigning students to the projects very easily. So if you want to have two or more similar projects (or courses with 2 or more teachers), then you only need to increase the allowed maximum number of students.
A high number of different projects is fine for your students,
since they can individually choose their favorite project.
But in the worst case one (or more) project(s) will get too few student selections and you can't offer that project.
So the students might need to elect for another project.
If you reduce the number of projects it will become easier and easier for the planner.
You can also see a small statistics of total electives, 1st elective, 2nd electives and 3rd electives as soon as students have chosen projects in the next tab.
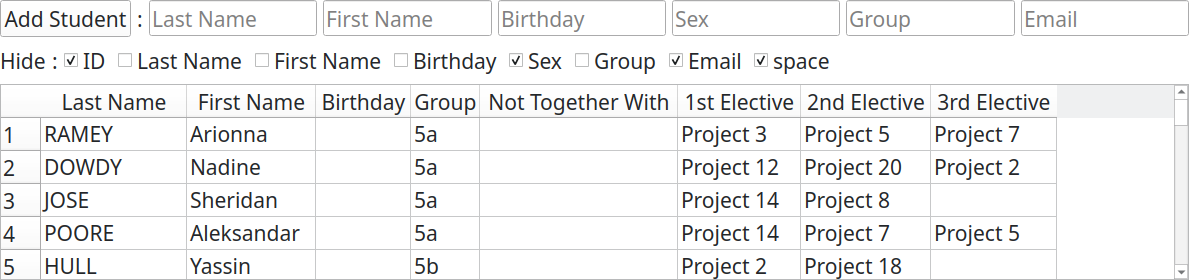
The Students tab lists all students along with their elective choices.
Write the students name in the upper text lines. Press Add Student to append the student.
You can do a (double-)click on many cells in the table.
You can delete a student if you (double-)click on the id.
You can modify the data if you (double-)click on it.
You can change the order of the sorting if you click on the headers.
Since new students will be added at the end of the list without any confirmation it might be useful to sort the list descending by ID. By that the last ID will be first in the list and you will always see if you added a new student.
The combination of First Name, Last Name and Birthday must be unique. If the combination of First Name and Last Name is already unique, then you can keep the Birthday empty. Alternatively, you can use Group Name or Email in the Birthday column to ensure uniqueness.
The Group Name is useful to check if your data is complete, since you can see a small statistics on the groups in the next tab.
If you click into a Not Together With cell, you can select students that are not allowed to be together in the same course. You can select multiple students.

In this tab you can see a small statistics about the groups. This might help you to locate missing students.
An alternative variant to avoid missing students is to import (first or later) all student names from your school administration software (without the electives). Then (or before) you enter or merge the electives and by that you can see missing students quickly.

The generate tab is mainly designed to start the automatic assignment and view the results.
The number of Max Conflicts sets the number of students that might not get one of the 3 choices. In the normal case you should decrease this value down to zero.
If BaElTo is able to assign all students to one of their 3 choices without conflicts, then you should try to minimise the number of Max 3rd-choices. If you decrease it down to zero, then no student will get one of his 3rd-choices. If you decrease it to one or higher, then in the worst case BaElTo might present you a solution with a higher number than the set value. So please check this carefully.
If your dataset is solvable without any 3rd-choices, then you might also want to lower the number of Max 2nd-choices. If you decrease it down to zero, then no student will get one of his 2nd-choices. If you decrease it to one or higher, then in the worst case BaElTo might present you a solution with a higher number than the set value. So please check this carefully.
The Seed affects the random generator. The algorithm will produce identical results if started with the same seed. You normally don't need it, but it helped the author in developing the software very much.
Also the benchmark spin box won't probably be useful for a user's daily work. But it also helped the author while developing and comparing the speed with other course planning software tools.
The Restart Time Limit spin box sets a countdown for a restart.
The author preferred a relative instead of an absolute value again.
So the countdown always restarts as soon as an improvement is found.
So far I haven't noticed any improvements by restarting,
since these basic elective problems are much easier than timetabling problems.
If the value is too small, a solution might never be found.
If it's too high, you might wait excessively long to find a solution.
A "medium" value might bring you on average much faster results.
So I can't recommend a "good" value.
It is also dependent on the speed of your computer and the difficulty of your data set.
Finally you only need to press the Generate button and you will hopefully see a bit later the results in this tab.
add a print feature and send email feature
BaElTo supports a flexible CSV file import.
Save the CSV files with header, UTF-8 coding and with BOM. Save with text-quote " and field-separator ,.
You can choose the fields that should be imported by the CSV file: First name, last name, birthday, sex, group name, email, 1st elective, 2nd elective and 3rd elective.
You can create a new portfolio or merge the data with an existing portfolio. If there are duplicated data in the CSV files, then you can import all, skip duplicated or update duplicates.
You can import the data from Google Forms. You need a free Google account for this. While your students do not need to have a Google account, it simplifies the process if they do. There are 2 variants how to do it. With Multiple-choice grid or with Drop-down.
The beginning is both times the same. Start a new form. Fill in the Untitled form and Form description. It might be your Portfolio name and a small information for the students about the project.
If your students all have got an Google account, then I highly recommend to swap from the Questions tab to Settings tab. Have a look into Responses. Select in Collect email addresses the option Verified. This will automatically collect the email of the students. This will help you to locate duplicates and missing students much faster.
Now add in the Questions tab a Short answer. Ask for the first name in the Untitled Question line. Check the Required button.
Add a second Short answer. Ask for the last name in the Untitled Question line. Check the Required button.
If the combination of the first and last name is not unique, then you need a third information. In BaElTo this is the birthday by default, but you can also use the group name, email or an other value for this.
So add at least third question. If you want to ask for the birth day, then I recommend to use a Date, not a Short answer. If you want to ask for the group name, then I recommend to use a Drop-down, not a Short answer. A Drop-down question might look like much more work, since you need to add all answers yourself. But you will probably save much more work later, since students know a hundred variations on how to write their group name and will take much time to tidy up their different ways how to write group names. Don't forget to check the Required button.
The last step is asking for the electives. There are 2 variants how to do it: With Multiple-choice grid or with Drop-down. Both variants have got different advantages and disadvantages.
Variant Multiple-choice grid: Add a Multiple-choice grid.
You must ask for the Elective in the rows.
So write for example 1st Elective, 2nd Elective and 3rd Elective in the rows.
Write the project names in the columns.
So write for example Football, Dancing, ... in the columns.
Please don't swap the rows and columns.
I know that swapping them might look nicer, but the CSV file can't be imported in that case!
In best case you also check the Require a response in each row button.
If you don't check that, students might select no project at all.
Click on the options button (the 3 vertical dots icon) and check Limit to one response per column.
If you don't check that, students might select 3 times the same project.
The Form for the students might look like this:
Editor link for Multi Choice Grid
Responder link for Multi Choice Grid
Variant Drop-down: Add a Drop-down.
Ask for the 1st Elective in the Untitled question.
Add all project names as options.
Check the Required button.
Now click on Duplicate questions button (the 2 papers icon).
By this you don't need to add all project names once again.
You only need to modify the question.
In best case you keep the Required button selected and repeat this a third time.
The advantage of this variant is, that it might look better.
It is maybe easier to understand and
it is easier to force for example to electives but make the 3rd elective optional.
The disadvantage of this variant is, that a students might select 3 times the same project.
The Form for the students might look like this:
Editor link for Drop-down
Responder link for Drop-down
Don’t forget to give this form a meaningful name. (Rename the Untitled form in the upper left corner.) The last step is publishing the form (press on the Publish button) and send and/or publish the Copy responder link.
You will see the answers in the Responses tab. Click on Link to sheets and Create a new spreadsheet. Click on File -> Download -> Comma separated values (.csv) and store the results on your hard disk. Now you can import the answers into BaElTo.
Please report mistakes, nice examples or other suggestions to the author.
You can also check out my YouTube channel and the FET Forum.
Yours
Volker Dirr